A Decorative Element
In the days leading up to our vacation, I was able to sneak a little time and get back to work on the coffee table project and make the circular decorative element that will grace each end. I started out by ripping off an edge of one of my extra walnut boards that had a bunch of sap wood on it that made it undesirable for use on the top. Sap wood is the lighter colored wood and really stands out against the dark walnut interior wood. Sometimes it is desirable to see but in this case I didn't want it.
Once I had the strip cut out, I cut it into pieces putting a 22.5 degree angle on each end and making them to an exact length. Geometry tells me that if I have eight pieces with that angle and put them together as above, I will form a circle and indeed it did. I could have made it out of a solid very wide board but with vertical grain going across the thinnest part later on in the process, it would have weakened the circle making it more prone to breaking and it would cost me a lot of money instead of just using up leftover scraps as I did in this case.
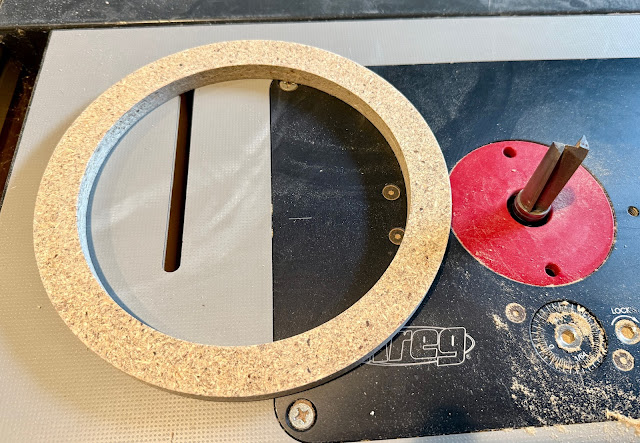
While the glue was curing, I got busy on making the template above. I made a circle making jig for one of my hand held routers that allows me to screw it to the center of the circle and then spin the router around in a full circle keeping it precisely aligned. I cut the inside circle almost through the particle board that I was using for the template but not all the way. I then adjusted the jig and cut all the way through on the outside part of the circle. I am prevented from cutting all the way on the interior circle because I would essentially create a situation where one the ring itself would be freed and then could be caught by the router bit and mangled or tossed into my face or some other non-desirable outcome. With the circle mostly established by the router but not cut all the way through, I could carefully trim it using a jigsaw and then used the flus trim bit on my router to smooth it into the precise circle I wanted. You can see my completed template above.
Note, I had thought I had taken pictures of this part of the process but evidently didn't. I blame the hot weather!
With my template completed, I used it to trace my circle on the glued up blank and roughly cut it close to the line without touching it. I then fixed the template to my blank using double sided tape and then used the flush trim router bit above to shape it all down nicely so that it looked identical in size to the template, only much thicker. I then cut the one thick ring into two thinner rings and I am left with what you see below, two wooden centers made out of walnut. I still have some more joinery left before I can attach them to my coffee table but I'll leave that for a future post.


Wow. Thanks for posting (and describing). These sorts of things are so amazing to me!
ReplyDeleteThere are lots of ways to do things but I thought a bit more detail on one of those ways might be inspirational to others.
DeleteInteresting to see the process! I've never thought about how complicated it might be to make a circular ornament like this.
ReplyDeleteThere definitely are a few steps that take a fair amount of time which is why I went ahead and applied finish over the rest of the project while doing these.
DeleteI can't imagine how it will be all put together. Can't wait!
ReplyDeleteI think I have the end result in Wednesday's blog post.
DeleteInteresting (and logical) to see how making it that way will make it more structurally sound.
ReplyDeleteOnly slightly stronger. Gluing end grain to end grain is a pretty weak joint too. Fortunately though, once I have them glued in place, they won't see any strong forces. I only need them to hold up for the fabrication process.
DeleteMath:)
ReplyDeleteI have to admit, there are online calculators that due the math for me. I just input the inner and outer diameter of the wooden ring and it will tell me how many segments, how long, how wide and the angle of the cut.
DeleteThat's really neat, Ed. I can't wait to see it all put together.
ReplyDeleteTomorrow morning, that post will be posted.
DeleteThat is so cool. Both how you made the circles of wood, and that you shared it here so we non-wood-workers could see and understand the process.
ReplyDeleteKay of Musings: OK, I’ve always said you were a master craftsman, but I see this shows your engineering background too.
ReplyDelete